Wednesday, December 28, 2011

Lego Photo #3: Holiday Edition 2011


Merry Christmas and Happy New Year! 

This was my latest Lego photo endeavour as well as our Christmas photo for the year! I kept it quite simple, placing everything on some cotton batting to try and mimic snow, and back lit it with sunlight to make the star glow as much as possible. I wanted to try doing it on real snow, but that is sadly it is lacking in California! 

Thanks to all of your folks for taking interest in the projects I working on this year and for all your supportive comments and questions. I'm hoping to do even more posts next year so I hope you'll enjoy!

Wednesday, December 14, 2011

Lego Photo #2 - Curling Edition

I've been working away at top secret Christmas gift projects and so haven't really had much that I can post on here recently. I did however make this little vignette for my Dad's birthday card last month. It's a little montage of me and my dad, and our good friends Paul and Ken all curling together. 


It was pretty fun trying to make little curling rocks - and they do rock in fact! They have little round bases, and so can slide and spin around. The ice part was rather time consuming - placing all the tiny pieces, but I think in the end it turning out fairly realistic. I did some photoshopping on it to give it a more aged appearance which I think fits the picture better. Notice how I made sure I'm not sweeping!! 

Friday, November 11, 2011

Remembrance Day

Lest We Forget
Modeled after the Tomb of the Unknown Soldier in Ottawa


Thursday, November 10, 2011

Woodturning Club Competition

This past weekend the wood turning club I belong to had their annual competition. They put a lot of work into the organization and how it all comes together, making sure that every single piece that gets submitted gets constructed feedback of what is good about the piece and what could be improved. This is all done by two guest judges who examine each piece and critique it and finally award various prizes. There were 98 entries and they got through them all in about 3 hours! I stuck around and listened to what they said about mine. But there was also someone frantically noting down all their comments so at the end we got nice little comment sheets. They even took really nice photos of all our work and printed those on the pages with teh feedback. Luckily, there are several categories as well as skill levels you can enter, so I didn't have to worry about going up against some of the geniuses in the club. They were very encouraging and I thought I'd give it a go and at least get some good pointers for what to improve. 

This was my first ever natural edge bowl. The photo looks about 200 times better than the actual bowl, but I didn't really know how to finish it or a good technique for the inside. The judges were very helpful in describing better ways to get a nice form, finish and some techniques, so I'm going to try another one soon while I still remember. 


This was a lidded box I made about a year ago, and to my surprise it won a second place ribbon in the beginner box category! They still had many suggestions for improvement, so I'll keep working on those things as well.

All in all it was pretty neat to see all the things everyone made, and there were some pretty awesome pieces. And it was really great to get some feedback from people who really know their stuff. 

Monday, October 31, 2011

Happy Halloween

One of Jerome's favourite movies is The Nightmare Before Christmas. So last year I made him this paper rendition of Jack the skeleton. Complete with string mouth. My original vision was to do it out of leather and stitch it all, but white leather is annoyingly hard to find. Someday I will find some though, and he will be made again! 
Happy Halloween!  

Tuesday, October 25, 2011

Lego Photo #1

Earlier this week I posted a fun photo to our cooking blog of Jerome and I cooking in Lego form. It got quite a few comments and emails from friends and family, so I thought I'd start posting some of the other Lego photos that I have taken in the same sort of series.


As most people who know me can attest, I am a big Lego fan and have collected a fair amount of Lego over the years. Our wedding cake toppers were even Lego people! Earlier this year I was messing with my Lego people and made one that had a moderate resemblance to me which I thought was amusing. I had found a little grassy area near work to eat lunch at and saw a tiny flower one day and thought it would be just the size for a Lego guy! So I lugged my camera and my Lego Laura to work one day and at lunch had a little photo shoot. I'm sure the people in the office building thought I was nuts, but I thought it was really interesting how the scale and juxtaposition of the natural world and the Lego came together. With a little tweaking it came out pretty nicely, and I ended up using it as a card for random notes, like I'm giving the recipient a little flower.


One of the other photos from the shoot which I didn't edit or anything. 

Thursday, October 20, 2011

A Whale of a Tale

A few months ago, my bestest friend, found a whale tissue box holder on Etsy that she loved. She sent me the link, and her exact comment was:
"LAURA!! Please please please please please please consider making one of these."

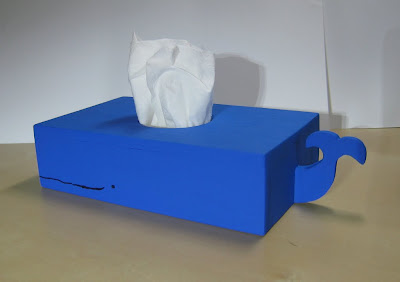
Well, as I was looking for a project, the boxes were super cute and her birthday was imminent, I considered it! However, I wanted to put a bit of my own spin on it. So I decided to make a mini whale tissue box using those tiny pocket packages of  tissues, so that he could live on her desk at work and not take up too much room. This is especially fitting since she's a marine biologist!

I made him out of thin plywood using measurements from a small tissue package. I drew up a little tail and attached it to the box. I left the bottom open to allow easy access to replace the packet. I drill a hole in the top and rounded all the edges to ensure no snags. 

Here is is after I'd put on the first coat of paint. It's the only one I have with a clear scale to show how small he is. The little lego lady is taller than him! 

Here is is complete with his smile and eye and a clear coat on top. Luckily he survived the long mail voyage all the way to Edmonton, and is now enjoying his new home!

Thursday, October 13, 2011

Spoon Rest

So to get back to turning, I decided to take on a nice simple small project. A spoon rest! I had the idea for it several months ago, just a simple cylinder with a concave surface and a small flat area so it doesn't roll around. I've made several wooden spatulas in the past which you can see here and it's always a pain when you have to lay them on the counter. That being said we wipe down the counters anyways, so I don't mind if there are drips, I just wanted something to prop up the spoon and not take away much counter space. 

Here you can see it in action with on of the spatulas I made. 
You may have seen it before as we use it in almost all of our cooking adventures!

You can see the concave area and flat spots here. 

I polished it up with wax and buffed it so that the food won't stick to it. 

I'm thinking it would be a good set to give as gifts for the upcoming holiday season. 
We'll see though, I have a few other projects up my sleeve that may need to come first. 

Friday, July 29, 2011

Zelda Marquetry

So I've been working on this project since February, but I've been a bit stuck with finishing it, so I'm hoping by talking about what I've done so far, it'll be easier to get the last steps done. Originally I was just going to make a simple lap table to stop my legs from getting burnt when I used my computer on the couch, which I did often not having a desk. I figured it was a good place to practice some of the techniques I learned in the marquetry class several years ago, and get to crack open my box of veneers! Since then I've gotten a desk and don't really need a lap table anymore, and so I think for now it's simply going to become wall art, as I am pretty happy with how the marketry turned out. I wanted something fun, but not to complicated for my rusty skills. One of the first things Jerome and I came up with was the Triforce, but that seemed a bit too simple, so after some image searches online, I decided to attempt the Hyrule crest from Zelda. 

After picking my veneers - walnut and flame birch (I think). I traced out a version of the crest that I had adapted in Illustrator from a picture I found on the web of the Hyrule Shield. It's traced onto freezer paper which is translucent enough to see through. I then centered it and taped the side so I could flip back and forth as I needed it. I had some graphite paper from Lee Valley that I used to transfer the image. It was really nice to work with since it didn't come off on my hands, but it didn't erase easily from the wood once I was done. 

I attempted to make a jig to saw out the pattern, but after several attempts, I gave up on that, and dug out my sharpest exacto knife and carefully hand cut the parts. Which is a legitimate technique, just not the one I was intending to practice - oh well! So this whole principle works by cutting both pieces of wood at once so that the hole and the insert are identical. This is nice as if you wobble a bit on a part, it isn't very obvious, since they'll wobble in perfect unison! I also had to pay attention to the grain and flame direction, so that all the pieces have the same flame direction and don't look wonky. 

Here it is part way done. I went through a lot of Magic tape! But it's important as you want to get the insert in the opening as perfectly as possible. I also ensured that the tape covered all seems so that once I glued it to the backer piece, no glue would seep through and mar the front. 

Here it is all cut out and taped to an inch of it's life. The veneer is really thin - 1mm or thereabouts. So it's pretty delicate when you're trying to move it around. You can see my alignment marks in case my pattern slipped which took a long time to get rid of. The background veneer is a bit wavy which worried me a bit and is oversized at this point to help make gluing it all up easier. 

Here it is glued to the board with the tape gone. This was the first time I got to really see how it looked. I forgot to take a picture of the glue set up. It involved a lot of wood glue, all the clamps I have here, and a giant pile of  everything heavy I could find in my shop on the middle of the board, all with the hope and intent of not getting any air bubbles, waves or ripples in the end. Which thankfully worked! The book-matched walnut worked really well, it adds to the symmetry of the design, and the center seam ended up invisible which was what I was going for! 

Once that was glued for a month or so, I managed to finally sand all the marks of and get it nice and smooth. After some debate about how to finish it a few weekends ago I gave it a few coats of tung oil, then let it sit until last weekend when I gave it two coats of beeswax. This finish combination gives it a nice golden shimmery tone which suits the design well. 

Now for the trickier part. I want to put a frame around it so I can put it on the wall. But I have no table or miter saw... so it's going to be interesting. I had some nice maple which I cut into strips last weekend and hand-planed as straight and true as I could. Then routered a rabbet to set the main part into. But i'm not really sure how I'm going to get nice crisp perfect corners with only a band saw. So feel free to give me any tips, tricks, thoughts, etc and wish me luck this weekend as I try and finally add this project to my completed list!

Monday, July 18, 2011

Saskatchewan Roughrider Android

Our good friends moved away from us last week, and in honour of their move, I attempted to recreate our friend Jesse - an avid Roughrider's fan in Android form. 

Tuesday, June 21, 2011

Evolution - 25 years of Turning - WBAW entry to the AAW Symposium


This is what the amazing people in my turning club put together this month for the 25th AAW symposium. There are 25 miniatures (1.5"cube max dimensions) representing all different types of turning. The carousel was also turned! It's hard to see the details of all the miniatures, but I got to see them in person at the last meeting and they are ridiculous! All of the lids to the boxes are removable and they are hollowed, there's tiny carving and burning on some. There's even a segmented piece in there with over 100 pieces! 

I've got a lot to learn from these folks! 

Friday, June 17, 2011

Mario and Princess Pillows

A year and two weeks ago some good friends of ours got married. At the time I had a bit of free time on my hands so I wanted to come up with something fun to make them for a gift. They are both Mario fans, to the point where the cake topper at the wedding was Mario and Princess, so I decided to stick with this theme and design a pair of pillows.

I found some small images online and messed around with them until I was happy with the size, layout and breakdown of the colours.

I then took my pattern pieces and traced them onto fusible interfacing.

I had some neat batik fabric that suited the cartoonish style, and I luckily found the remaining colours in a similar pattern at a local fabric store. I then started fusing the interfacing to the back of each piece. 

Here they are all fused together on the background

Next came the painstaking process of  slowly and carefully zigzag stitching all around everything.  

This was by far the most time consuming  and scary part, but it was worth it though, it makes it pop so much more!

They make quite a cute couple, especially with the checkered border.

Here's is Mario complete with piping!

And Peach!

They can look adoringly at each other from opposite ends of the couch. 

Or cuddle up next to each other!

Turning over a new leaf

As I mentioned in my last post, I was letting this blog slip; Well that was 6 months ago! I realized my main issue with the blog was that although I love woodworking, it isn't really what the majority of my projects are focused on at this time. I hope to make it more so as I get better at it, and have more time to focus on it. But over the past few years, I have found myself coming up and making projects as needs arise and they are in all sorts of mediums such as sewing, paper, photography, lego etc. and I'd like to document those as well. So as of now this will be a blog about all the random stuff I make! I have a bunch of cool things that I've been wanting to share somewhere so there'll be some catching up to do for a while, but it should be fun! So I hope you come along for the ride!