Thursday, May 10, 2012

Lego Photo #4: Mum's Sewing Room

Here is another Lego photo that I took a while ago - last summer I believe, but thought since Mother's Day was coming up, this would be a good time to post it! It's a photo of my Mum in her sewing room, with her cutting table, dress form, rotary cutter, pin cushion, sewing machine, and a little quilt in the works.
I didn't do any real editing to these ones, just set them up with some good lights, on my desk to mimic her wood floor, and then started taking pictures. 


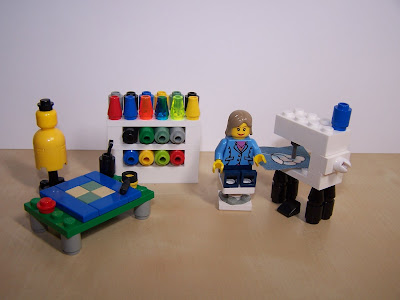
This one was a nice overall view that showed all the elements that I had incorporated. 

But in some ways I prefer this one, as it is a more realistic view point, as if another Lego person took it instead of from above. 

Sunday, May 6, 2012

Wood Duck Call

Another one of my March projects was to make a wooden duck call. I got the kit for this a few years ago because it sounded awesome, but was having a hard time finding the weird drill bit size I needed. I happened to find out that we had one at work so borrowed it one weekend to finally be able to turn my duck call!! This was for my Dad as he likes ducks. I don't know if he'll find any or not, but it was fun! 

It is made in two parts that slide together and so I had to fit the parts quite carefully which was a fun and interesting experience. Here is the first part as I was working on it on the lathe. 

And here is the second part. They actually went together quite well. Perhaps beginners luck, but I also tried to go very slow and check often to avoid making it too big. 


Here is is with the duck call parts installed.

 
And here it is put together.

 
This is where the funny sound comes out of.

 
And this is where you blow into it. I sanded it well to avoid splinters!!

A small washer is added in a grove to create the seal for the call.

And here is a very poor demonstration of what it sounds like! 
It sounds alot different than I thought it would. But apparently that is because this kit was for a Wood duck which has a squeakier, whistlier sound than the typical quacking noise. 

Wednesday, April 18, 2012

Bird Note/Photo Holders

These are the first of the projects that I was working on in February as they've arrived to their new owners now. They are a pair of cute little bird note/photo holders. I got the pattern from a recent issue of Stitch Magazine. It's actually my favourite sewing magazine. It has the right combination of fun and useful projects, with full patterns and great instructions and lots of tips and stuff. I'd recommend it highly if you're looking for something different. They come out quarterly and you can get them at bookstores or Joann's - especially good if you wait for a coupon!


I made these for my Mum who's developed a liking for little sewn birdies recently. So when I saw the pattern, I thought of making them right away.


This is the small one. The feet and head swirl are made from those coated paperclips.


I had some neat fabric in two colours that I thought would make a really cute pair.


You're supposed to be able to put photos or notes in the top swirl.
Hopefully my hand stitching will stand up to the test! 


There was a big and a small one, so I tried one of each.


I also lined them with the opposite fabrics to give a nice surprise if you see into them!

Monday, March 19, 2012

Leather Jack!

Well I've been rather absent in posting, but that's because I've been making stuff! I had a goal to complete 4 projects in February and I did. Several of those items are gifts and will make their debut once they've been delivered to their recipients!

At Halloween I posted the paper Jack from The Nightmare Before Christmas that I'd made, and how I'd really wanted to make him out of leather to get the textures and depth. Well since I first had that idea over a year ago, I enlisted my Mum to keep her eye out for some white leather, which I wasn't having any luck with. Low and behold for Christmas there was a nice big piece in my stocking! So I dug out my pattern and got to it!


He looks much more like I had envisioned now. 

You can see the textures, and the depth of the layers coming out of the frame.  

The leather stitching also looks a lot better than the string had. 

Tuesday, February 7, 2012

Zelda Marquetry Frame Completed!

Well you may remember mid last year when I posted about a marquetry project I had done of the Zelda crest. The frame got put on the back burner a bit, but I finally got it all sorted out and finished this past weekend! Yay! 

Here it is with the frame installed

I added a layer of the dark veneer in the corners of the frame for an accent. 

I rabetted out the back so that the picture could sit flush with the back of the frame. This way I could use the removable hardware you see (from Lee Valley of course!), so that if I need to re-wax the picture, or decide I want to make a different frame, I can do it easily. I also drilled two holes to allow for screws to hold it to the wall.

With the final coats of wax on it, the neat grain pattern of the crest really shines out.


Finally after all the work of finishing and hanging it, I decided to relax the best way I could think of. Playing Zelda!! 

Friday, February 3, 2012

Giraffe Stuffed Toys

I love these stuffed giraffes! I've made a total of 6 of them now, and I still love them! Pretty much the hardest part is finding fuzzy giraffe print fabric. The patterns are from Carol's Zoo who makes a whole bunch of easy patterns for various animals. I've also made the penguin, and have the pattern for several others, but haven't gotten to them yet. You can check them all out here: http://www.carolszoo.com/patterns/index.htm.


The last pair I made were especially cute as I found red and blue giraffe print which was perfect as I had a friend and cousin who were both having babies, one boy one girl! For these ones, I simple took a few tight stitches for the eyes so there would be no risk of choking or anything.


This was the original set that I made, I started with one but couldn't stop. They worked out nicely as the print I found was more to scale for the size. I've only made the "Baby" giraffe, but he sits about 12" tall, so he doesn't seem too small. The pattern also comes with a "Mama" version. These ones I bought plastic safety lock eyes in different colours to finish them off since I was giving them to more grown up types.


The patterns are really straight forward and simple to follow. Only two pattern pieces. The sewing is pretty easy. The only trick I've found is to pin alot! Maybe this was just necessary as my fabrics were a bit stretchy. But I found if I took the extra few minutes to pin the heck out of them, then sewing took a fraction of the time. They look kind of funny all pinned up too! Anyways, if you're looking for a cute, easy, fun stuffed animal project, these are a fun place to start! 

Wednesday, January 25, 2012

E-book Reader Cover

A while ago we got an E-Reader and I've been wanting to bring it to work to read at lunch, but have been hesitant without some sort of case to protect it. We could have bought one, but of course I thought making one would be better, and more fun. Here's how it went!


This is my design/pattern/notes and instructions that I made up.
Very high tech as you can see!

   
I've been on a stripey fabric kick lately, so I picked one of my favourites and a complementary fabric to make the cover. 

I decided to use an elastic to keep it closed - like a Moleskine. 
   
An after several attempts and much figuring out, I got all the layers and elastic pinned together inside out.

I made the inside in two halves with another strip of fabric in the middle so that I could slip in some hardboard and padding to protect the Reader. Once the layers were all cut to size and inserted, I sewed it in place which secured everything, as well as closed the pocket and the elastic to hold down the Reader. 

And here is the finished product!!

I was pretty happy with how it turned out considering I didn't have a real pattern or anything to go off of. 

Now I just have to get some E-books...