Showing posts with label marquetry. Show all posts

Friday, June 12, 2015

Spring Project Progress

This spring has been a busy one, so I thought I'd share some of the projects I've been working on. 

To begin with, I've been working on growing this little baby who keeps getting bigger and bigger! But in between resting, walking and making sure she's well taken care of, I've been working on some other kinds of projects.

I made Jerome a patch for his backpack

And turned him a pestle for his Chinois for his birthday

I formed 14 new Shaker boxes - I'll do a separate post on that soon, with videos and everything!

I did do marquetry for the top of one of them though - it involved a lot of small pieces and a ton of scotch tape! 

But it turned out pretty well I think

I turned this Couronne Stick which is used in knitting somehow.. It was a present for my Mum, so I guess I'll see the results sometime soon! 

I started a project to combine marquetry and turning, with the intent to bend and glue the strip around the tealight holder. There were some wrinkles in the process, so it's not done quite yet. 

I made this pair of matching photo frames for the Grandma's to be. 

Then I went home to Ottawa for a few weeks, where we did lots of walking and more projects. We even saved this teeny tiny turtle from being run over by bicycles! 

Mum and I made some baby blankets and clothes - under close supervision of Rupert and Baxter

We experimented dying and painting some onesies

My mum gave us this awesome I-spy quilt she made for the baby with all sorts of fun animals and pictures to find and teach the baby with! 

I got to visit with Jerome's parents, and my Grandma, and lots of friends who threw surprise baby showers! I somehow didn't get any pictures of those though! 

Sunday, March 22, 2015

Winter Project Progess

Over the past few months, I've been kicking it into a bit higher gear in terms of working on projects. Trying to get a lot of partially finished projects completed, as well as get some news ones underway and done. I thought I'd just post some recap pictures of some of the things I've done since Christmas instead of trying to do a bunch of posts more in depth. I hope you enjoy! 

First up was doing the marquetry for the top of the shaker box I made several years ago. I'd been trying to decide between a few patterns and so not getting anywhere, so I eventually just picked this one. It's Link and Epona from Zelda. And I couldn't resist hiding a little Triforce as a surprise under the lid. This is the box with the cut marquetry before assembly and finishing. 

Here is the top of the box completed with finish.

And here's the underside of the lid. 

I hadn't turned anything in about a year, and wanted a simple project to wet my feet again. I decided to go for a doorstop as the front door kept slamming in the wind. I figured any mistakes wouldn't be noticed at all! I chose a random piece of wood from my stash, I have no idea what it is, but the grain and colour are quite beautiful. 

I also spent a bunch of time making a new "tower" of giraffes. (apparently that's what a group of them are called!) The fabric I used to get is discontinued, so I tried three new ones this time. They're all quite cute. 

I've been watching quite a few YouTube woodworkers, and I'd seen a few recently making Jointer's Mallets, which are big beefy all wood mallets that you use for chiseling or persuading joints to fit together. I figured I'd try one out, as using a tool you've made is always very satisfying! 

A better view of the nice wood grain - also from the mystery pile! 

I had this marquetry cut already from the Turned Tealight project I did. This was the inverse of the image. It seemed to nice to toss, so I'd kept it, and when I came across it, I figured I'd might as well turn it into a small wall picture. 

In case you're wondering about the sudden incentive to get my butt in gear, we are expecting a baby in August, so I figure I'd better get as many projects as I can done now, before I get too big, and then later, have my hands quite full with a new big project!! 

Tuesday, February 24, 2015

Marquetry Dog Portrait

Last Christmas we did our usual gift exchange at work. I got my co-worker Ann Marie, and immediately knew what I wanted to do. She had this beautiful smart dog named Tank who was one of our office dogs and never left her side. I wanted to make a marquetry picture of him. 

I had a few pictures of him that she had shared with me over the years, and I thought this one would be a really nice one to do as a portrait. 

I printed the photo to the scale I wanted and traced the colour changes in his fur as best I could. I then traced those lines onto tracing paper to use as my template. 

This is what it looked like after I'd cut all the parts and set it into the background. I cover it all with tape as I go so no parts will fall out or move around, but it makes for a big surprise at the end when you take it all off and get to see how you've done! 

Luckily wood comes in tons of shades and textures of browns, so it wasn't too hard to find several different ones that would give him the definition I was looking for. The tricky part was getting each colour in the right place so it would have the right look. 

I was still learning how to cut so many different colours, so I didn't get my pieces perfectly tight. Luckily when you add glue all the pieces expand, so I didn't have any big gaps. 

Here he is just after being glued but before sanding and finishing. 

I always love how much richer the finish makes the piece look. 

Unfortunately Tank passed away about 6 months later. He is greatly missed by everyone at the office, and was such a wonderful big guy.

Saturday, November 22, 2014

Marquetry Belt Buckles

Just over a year ago, I started making marquetry belt buckles. This past week I finished my 7th, so thought it might be time to blog about them! They are nice small projects (2" x 3") that are good for trying techniques on a small scale and have the benefit of being a cool useful item when they're done. I wear one of them almost every day, and enjoy choosing the one that fits my mood for the day.

This is my most recent one. A 1-up mushroom from Mario. I used this to try sand shading for the first time. The darkened areas of the mushroom that give it a more round look are achieved by holding the individual pieces in a pan of hot sand and basically toasting them! I also tested out a shellac finish on this one. The green material is a dyed veneer, and you have to be more careful with the finish so that it doesn't run. This was a good test, as I am working on a bigger project with similar veneer and wanted to have the process figure out before applying it to the big project. 

This was my very first belt buckle. I was hesitant to spend a lot of time cutting out a pattern, not know how it would work and how it would hold up to everyday wear. It worked better than I expected, hence making so many more. I used regular polyurethane for the finish on this one. 

This was a design I doodled one day, I thought the idea of a heart shaped gear was kind of neat. I cut it carefully and got two for one. By stacking the two colours on top of each other, the cut out of one, inserts in the other, and you get two very different looking buckles with the same design. I tried using Waterlox as a finish on these for the first time. I really liked how easy it was to apply and how durable it was as a finish. 


For these two, I used the same process to get two versions of the same design. I wanted to recreate an Escher tesselation, highlighting the main piece. So I decided to practice woodburning on veneer to outline all the surrounding flying fish. It was interesting to see how the veneer handled the wood burning and practicing how much heat and pressure to apply to get the right result. 

And then of course you may already know I'm a big Lego fan, so I decided to make a Lego Minifigure buckle. The main challenge to this one was to cut the tiny hands without them falling apart or cracking. I also got to see how to create the separation between the arms and the body by just making a cut in the wood. 

To turn these little pieces into belt buckles I buy these buckles from Amazon, and just screw them onto the back. The nice thing about this is, if I decide later I am tired of one design, I can just remove the hardware and attach it to a new buckle design!


Wednesday, September 17, 2014

Winnie the Pooh Marquetry Picture

So it's been a while since I've posted any projects here, but not for lack of making stuff. Things got put on hold for a bit while Jerome and I went on an epic adventure to southeast Asia! (You can click here to read more about this if you're interested) But now that we're back, and have organized all our photos I have a back log of projects that I'll be sharing over the next while. 


I thought I'd start with a pretty simple one I made for a friends baby. Growing up, I had a wood version of this image that had been my Mum's and I always thought it was so cute. So I decided to make a marquetry version. It's a very simple process, just put the two colours of veneer on top of each other, and cut through both to get the perfect fit. I glued it to some plywood, added matching veneer around the edges and back, as well as a hook hole at the back, a few coats of Waterlox and voila! 

Wednesday, October 9, 2013

Wedding Logo - Marquetry Coasters

A couple of good friends from school got married this spring. I wanted to send them something special to celebrate! Being a designer, she had designed a really cool logo/crest for their invitations and website and favours. I thought it was really cool, and wanted to use it in some way.


It was a bit tricky, since I had a printed version that was about an inch in diameter. I scanned it and blew it up to a size where I could have a chance at cutting it out of wood. Unfortunately, the outer text was still too small, so I decided to opt for the inner section only. I was originally thinking of doing it as an ornament, but Jerome chimed in that he thought something more practical would be fun. And so we came up with the idea of a pair of inverse coasters, which could be both practical and decorative.

Here you can see the marquetry completed. I didn't manage to take any process pictures as it required a lot of concentration to get all the tiny curved parts just right. But you can see that the cut out of one colour becomes the insert on the other. So by cutting both at once very carefully, I ended up with two! 

Here is a close up of the front of one of them without the tape. 

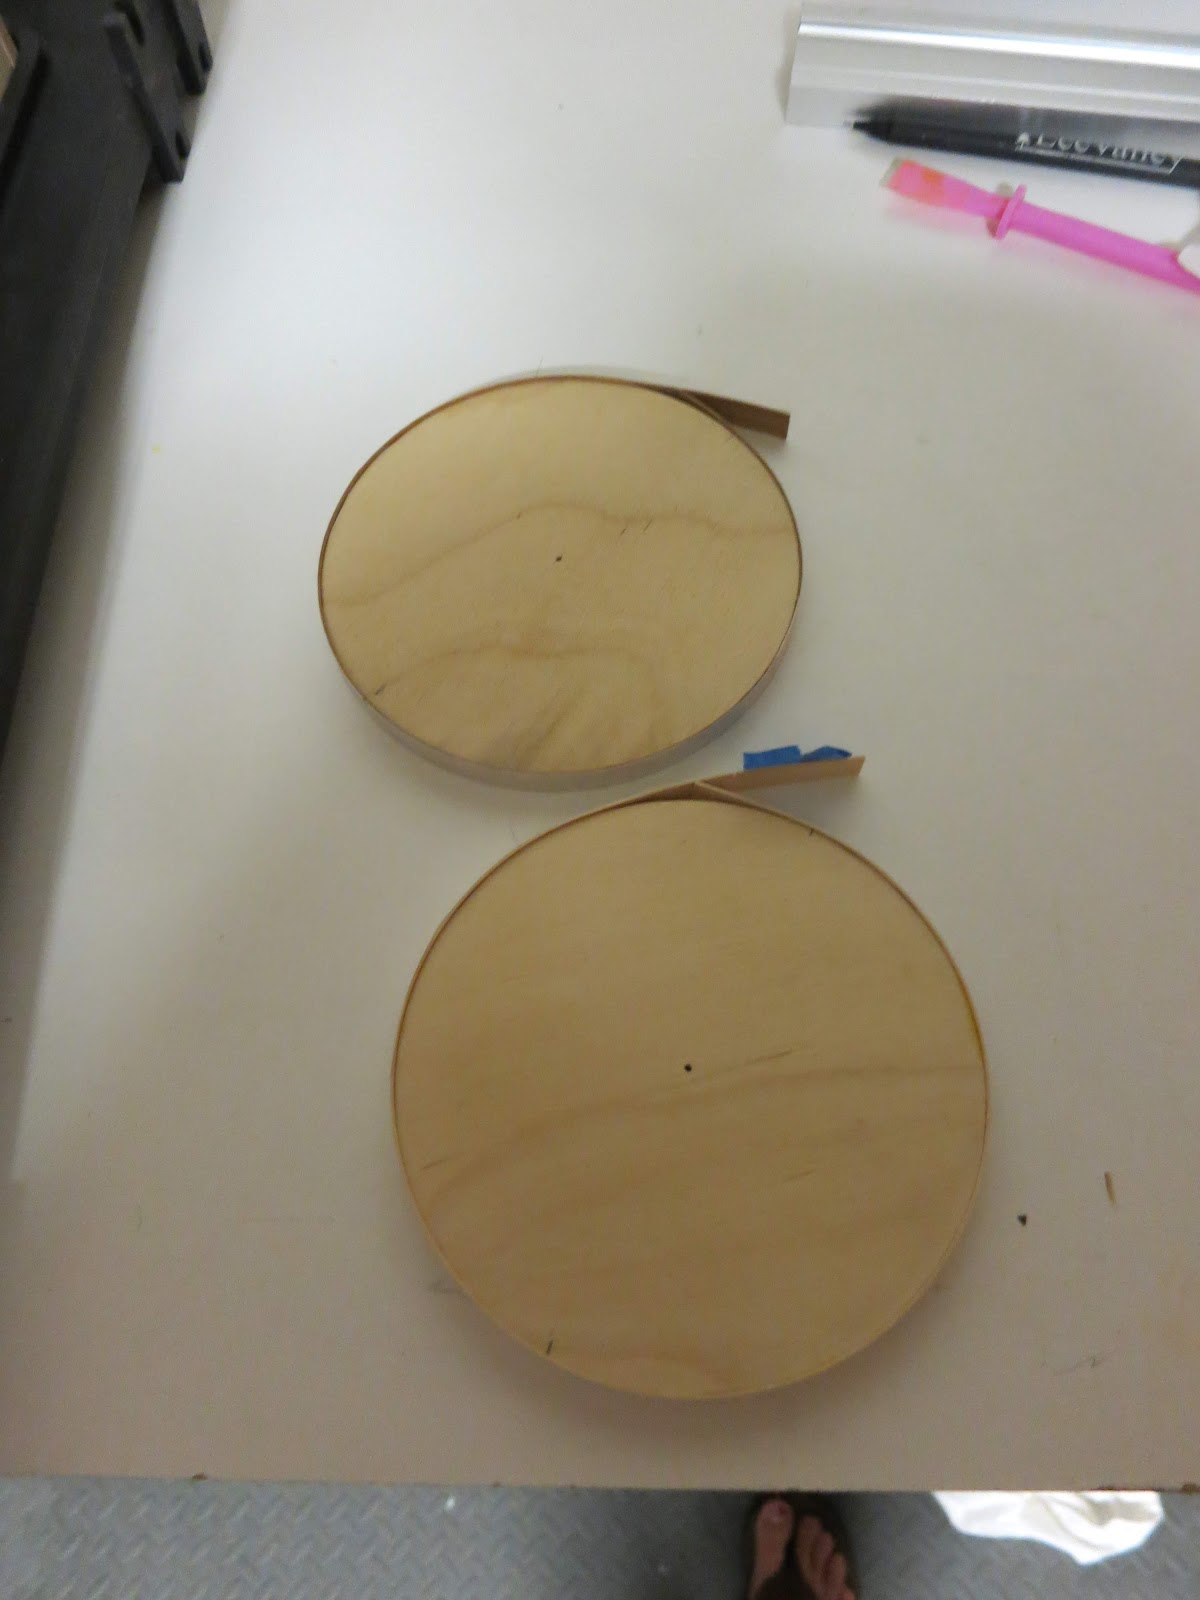
I cut two circles to final dimension from thin plywood. To make them look nicely finished, I first glued a band of veneer around the circle. You have to do this in two parts. The first is show here, where you glue almost all the way around, and leave long tails. Once this is dry, you cut through both layers at once on the unglued part, so you get a really tight and hopefully invisible seam. You then glue that last little section. The high-tech clamp you use for this process is a bunch of elastic bands! 

Next is gluing the top and bottom on. I don't have any pictures as all you really see is a lot of clamps. The top is tricky because it tries to slip off of center when you tighten the clamps. Luckily, it worked out pretty well on these. This one had slipped by a half mm, but I managed to recoup reasonably, and hopefully no one will mind it being out of centered by that tiny amount. 

After it's all glued and done, final sanding, I put a bunch of coats of Waterlox finish, to ensure it would be okay if any drips from a glass landed on it. And then I buffed it with wax to make it nice and shiny and give it even more protection. 

I also stamped my initials and the year on the backs before finishing. It's a very subtle way to sign a project. 

I shipped them out (several months late) and after a lot of fretting and hoping the postal services would do their thing, I got a call from my friend saying it had arrived and they really liked them and had put them on their newly arranged bar area! I hope they'll enjoy them as fun mementos of their happy day!